The two order types
The sticker builder can sell stickers two different ways, and you decide which of them your customers get. You can run one, the other, or both.
Sticker sheet / roll
Many designs packed onto one sheet or roll, priced by size. The shopper drops as many designs as they like onto a sheet at your print width, auto-nests them tight, and picks cut shape, white lip and laminate for the whole sheet. This is the original sticker builder and it is on by default.
Single stickers New
A stack of one design, priced by size × quantity. The shopper uploads one image, picks a cut style, a size and a quantity, and the price drops as the quantity goes up. This is the classic “100 die-cut stickers” order.
When both are turned on, the builder shows an Order type switch at the top of the page and the shopper picks for themselves — no reload, no second page.
Roll vs sheet is a third thing, and it isn't in that switch. Whether a packed order is produced on a roll or on cut sheets comes from your machine setup, not from the order-type switch. If you have more than one machine configured, the shopper gets a separate Print on chooser with each machine's real size on it.
Sheets & rolls: what the customer sees
Shoppers pick a sheet size, upload one or many designs, drag and resize them on a true-scale ruler, and hit Auto-Nest to pack them tight. A live resolution badge sits on every image, a fill percentage shows how much of the sheet is used, and the price reflects the sheet and the quantity of sheets.
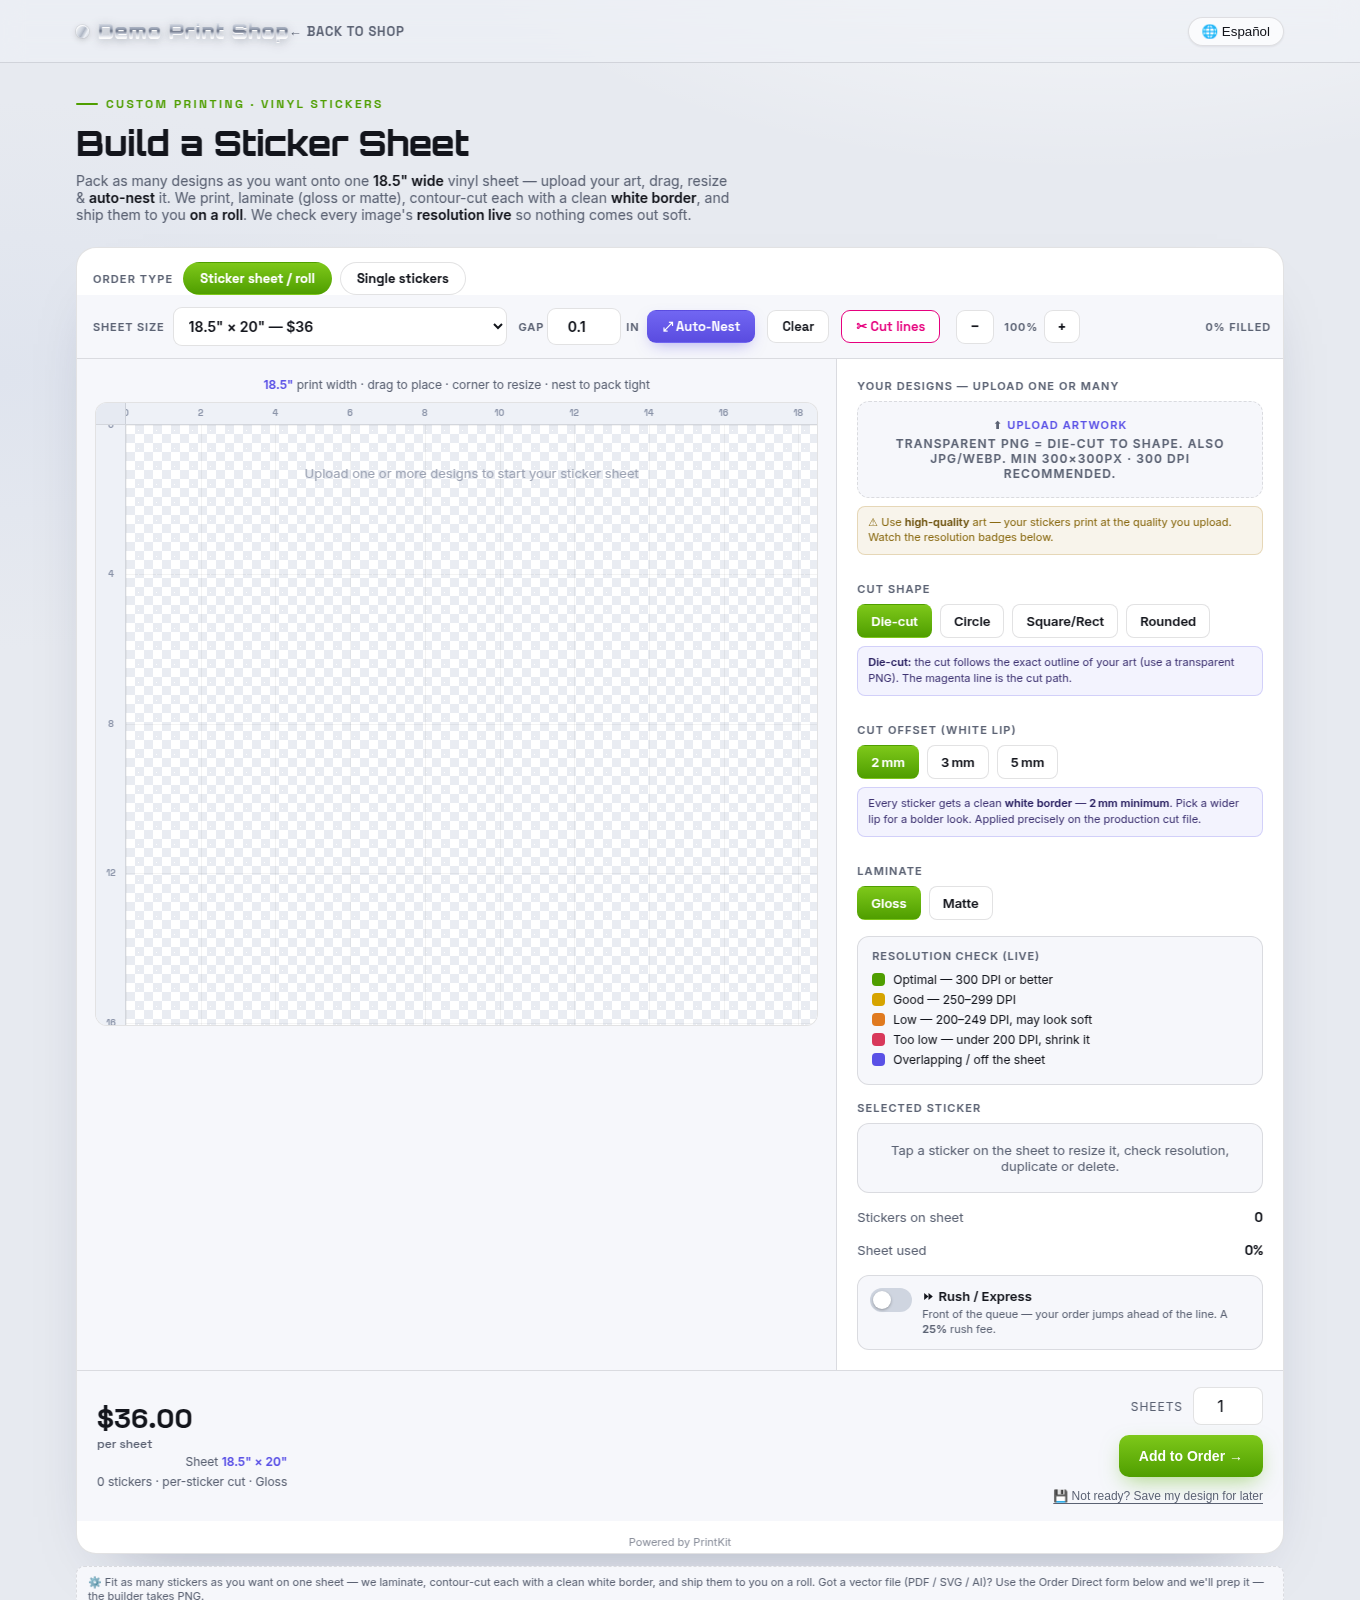
Controls the shopper gets in this mode:
| Control | What it does |
|---|---|
| Sheet size | Picks from the sheet or roll sizes you sell, each showing its price. |
| Gap | The spacing (in inches) auto-nest leaves between stickers. |
| Auto-Nest / Clear | Packs every design tight to the sheet, or clears the sheet. |
| Cut lines | Shows or hides the cut path preview on screen. |
| Cut shape | Die-cut, Circle, Square/Rect or Rounded. |
| Cut offset (white lip) | 2 mm, 3 mm or 5 mm of white vinyl around each sticker — 2 mm is the minimum. |
| Laminate | Gloss or matte, whichever you offer. |
| Remove background | Turns a solid background transparent on a selected design — which is what makes it die-cuttable. Available where you enable it. |
| Sheets | How many copies of the finished sheet to order. |
The on-screen resolution key is plain-spoken: Optimal — 300 DPI or better, Good — 250–299 DPI, Low — 200–249 DPI, may look soft, Too low — under 200 DPI, shrink it, and a separate flag for a sticker that overlaps or runs off the sheet.
Single stickers New
Single-sticker mode is one image, one shape, one size, and a quantity. It is deliberately simple: there is no canvas and no nesting, because the shop's RIP does the step-and-repeat from one print-ready file.
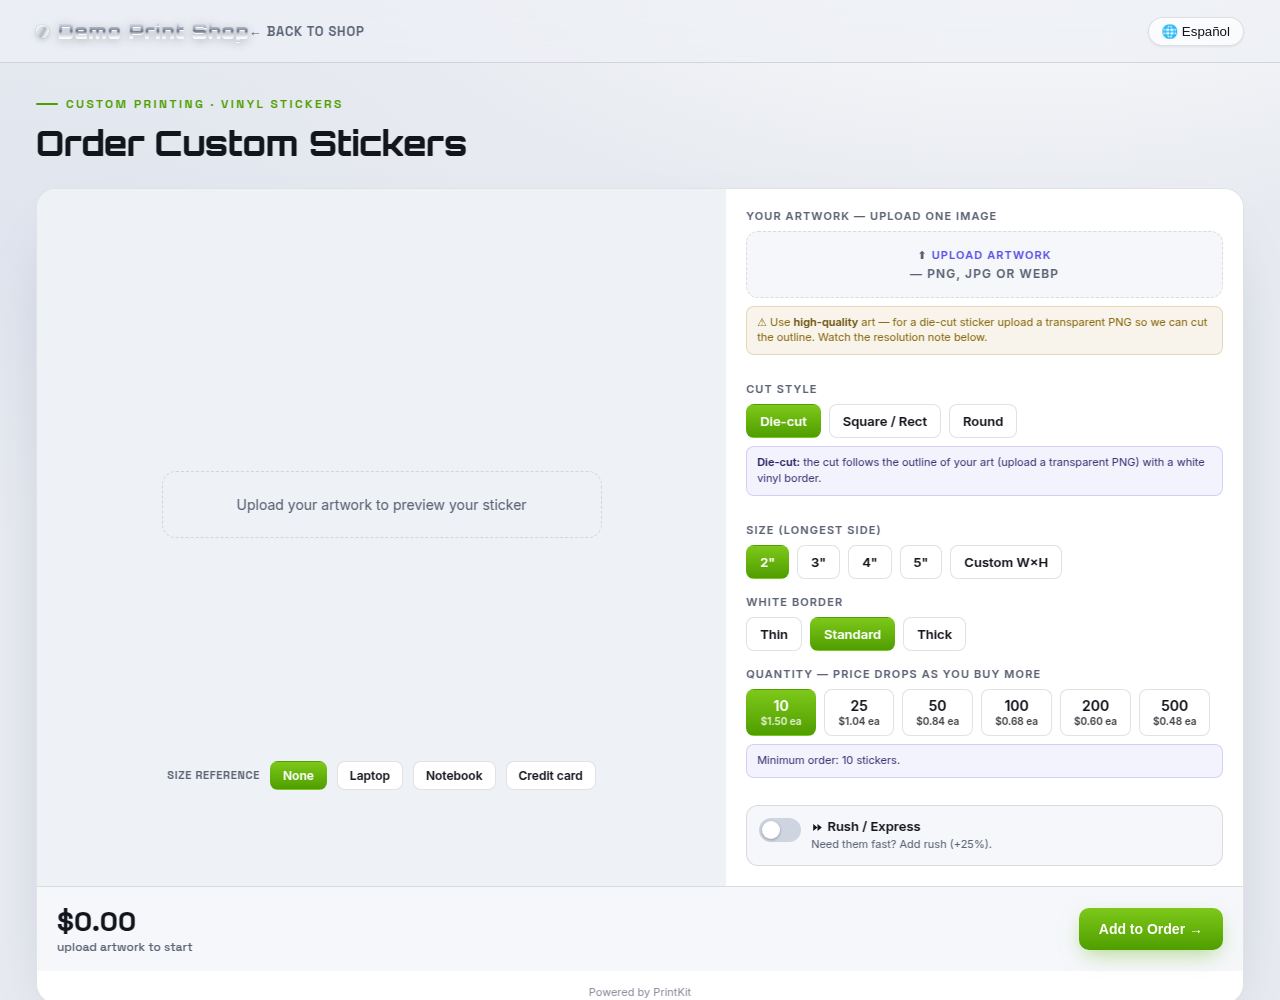
Cut style
Three options, and you choose which of them you offer: Die-cut (the cut follows the outline of the art — the shopper is told to upload a transparent PNG), Square / Rect (a clean square or fitted rectangle), and Round (a circle that contains the art). Each one explains itself in a line of help text under the buttons. Out of the box only die-cut is enabled, so switch on the others if you sell them.
Size
Size is by longest side, in inches. You set the size list yourself — the shipped starting point is 2″, 3″, 4″ and 5″, and you can rename, re-price, add or remove any of them.
You can also let shoppers type their own Custom W×H. That is off until you turn it on, and when you do you set the smallest and largest longest side you'll accept (1″ to 6″ to begin with). A custom size is priced at your nearest larger listed size, so you never have to price a continuous range.
White border
Every single sticker gets a white vinyl lip. You decide whether that is your call or the shopper's:
- Lock one border for all orders (the shipped default). The shopper sees no border control at all and every order uses your chosen lip — Standard, 3 mm, unless you change it.
- Let the customer pick thin / standard / thick. The shopper gets three buttons and the preview updates live.
The three widths are yours to set in millimetres; they start at 1.5 mm, 3 mm and 5 mm. Either way the chosen offset is recorded on the order and used to build the cut file.
Quantity tiers and the minimum order
You set one quantity ladder shared by every size — for example
10, 25, 50, 100, 200, 500 — then one row per size with the total price at
each quantity. The shopper sees the tier quantity in bold with the per-unit price under it,
and the running total in the price bar.
Enter totals that divide evenly. The per-unit price is the tier total divided by the quantity, rounded to the cent, and the charged subtotal is then rebuilt from that rounded unit price. A tier like $50 for 3 will drift by a cent or two. Tier totals that divide cleanly by their quantity always land exactly on your number.
You can also set a minimum order quantity. Tiers below it are hidden entirely, and a note appears right under the quantity buttons reading “Minimum order: 10 stickers.” Set it to 1 for no minimum. This minimum belongs to single stickers only — it is not the same setting as the shop-wide minimum used by the apparel, embroidery and UV substrate builders.
Size reference view New
Single stickers are hard to judge on a screen. Under the preview, the shopper can drop the sticker onto a familiar object at true relative scale: None, Laptop, Notebook or Credit card. It is purely a preview aid — it never changes the price or the file.
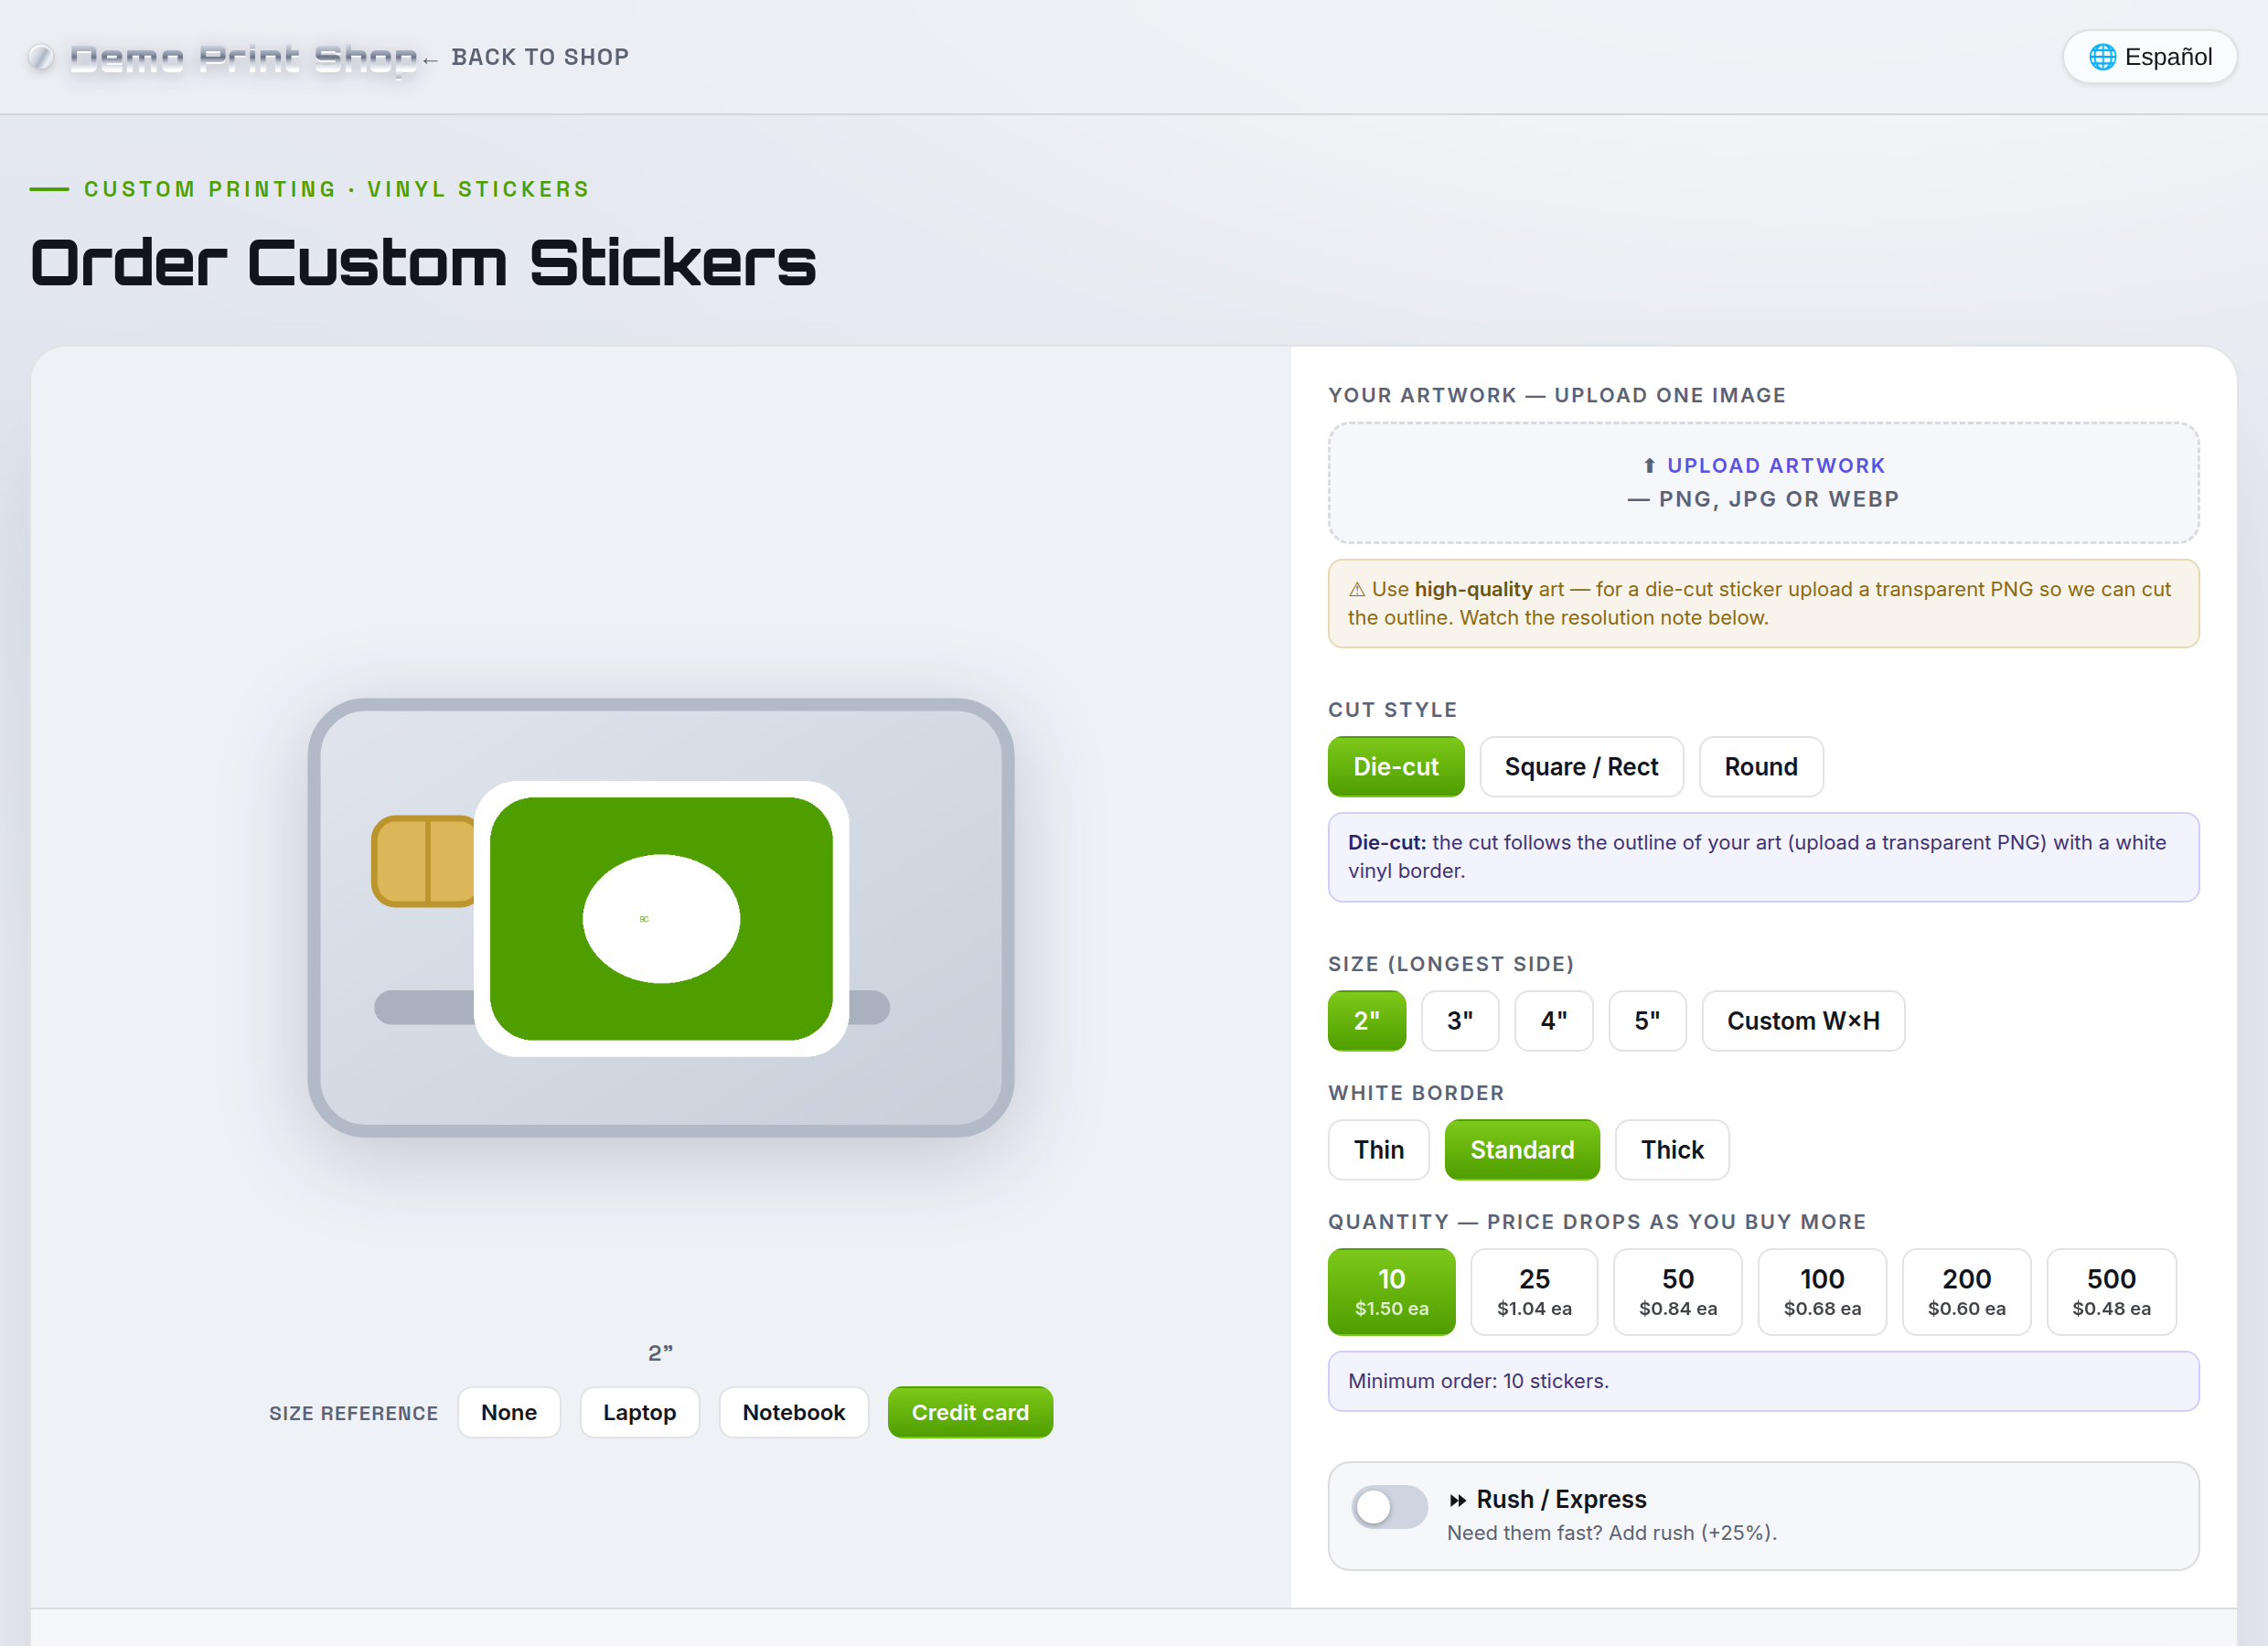
With None selected the sticker simply fills the preview at a comfortable size and the measurement is shown as a caption. Pick a reference and the sticker is redrawn at its real size against that object.
The credit card only appears up to 3 inches. Above that the sticker would cover the card completely and the comparison stops meaning anything, so the button is hidden — and if a shopper had already chosen it, the view falls back to the laptop.
Turning the order types on and off
Both editions have the same two checkboxes, in the sticker builder's setup:
- Shopify app — the PrintKit app in your Shopify admin → Builder → the sticker builder → the Single stickers card.
- Any website — your PrintKit portal → Config → Sticker Sheet Builder → the Single stickers tab.
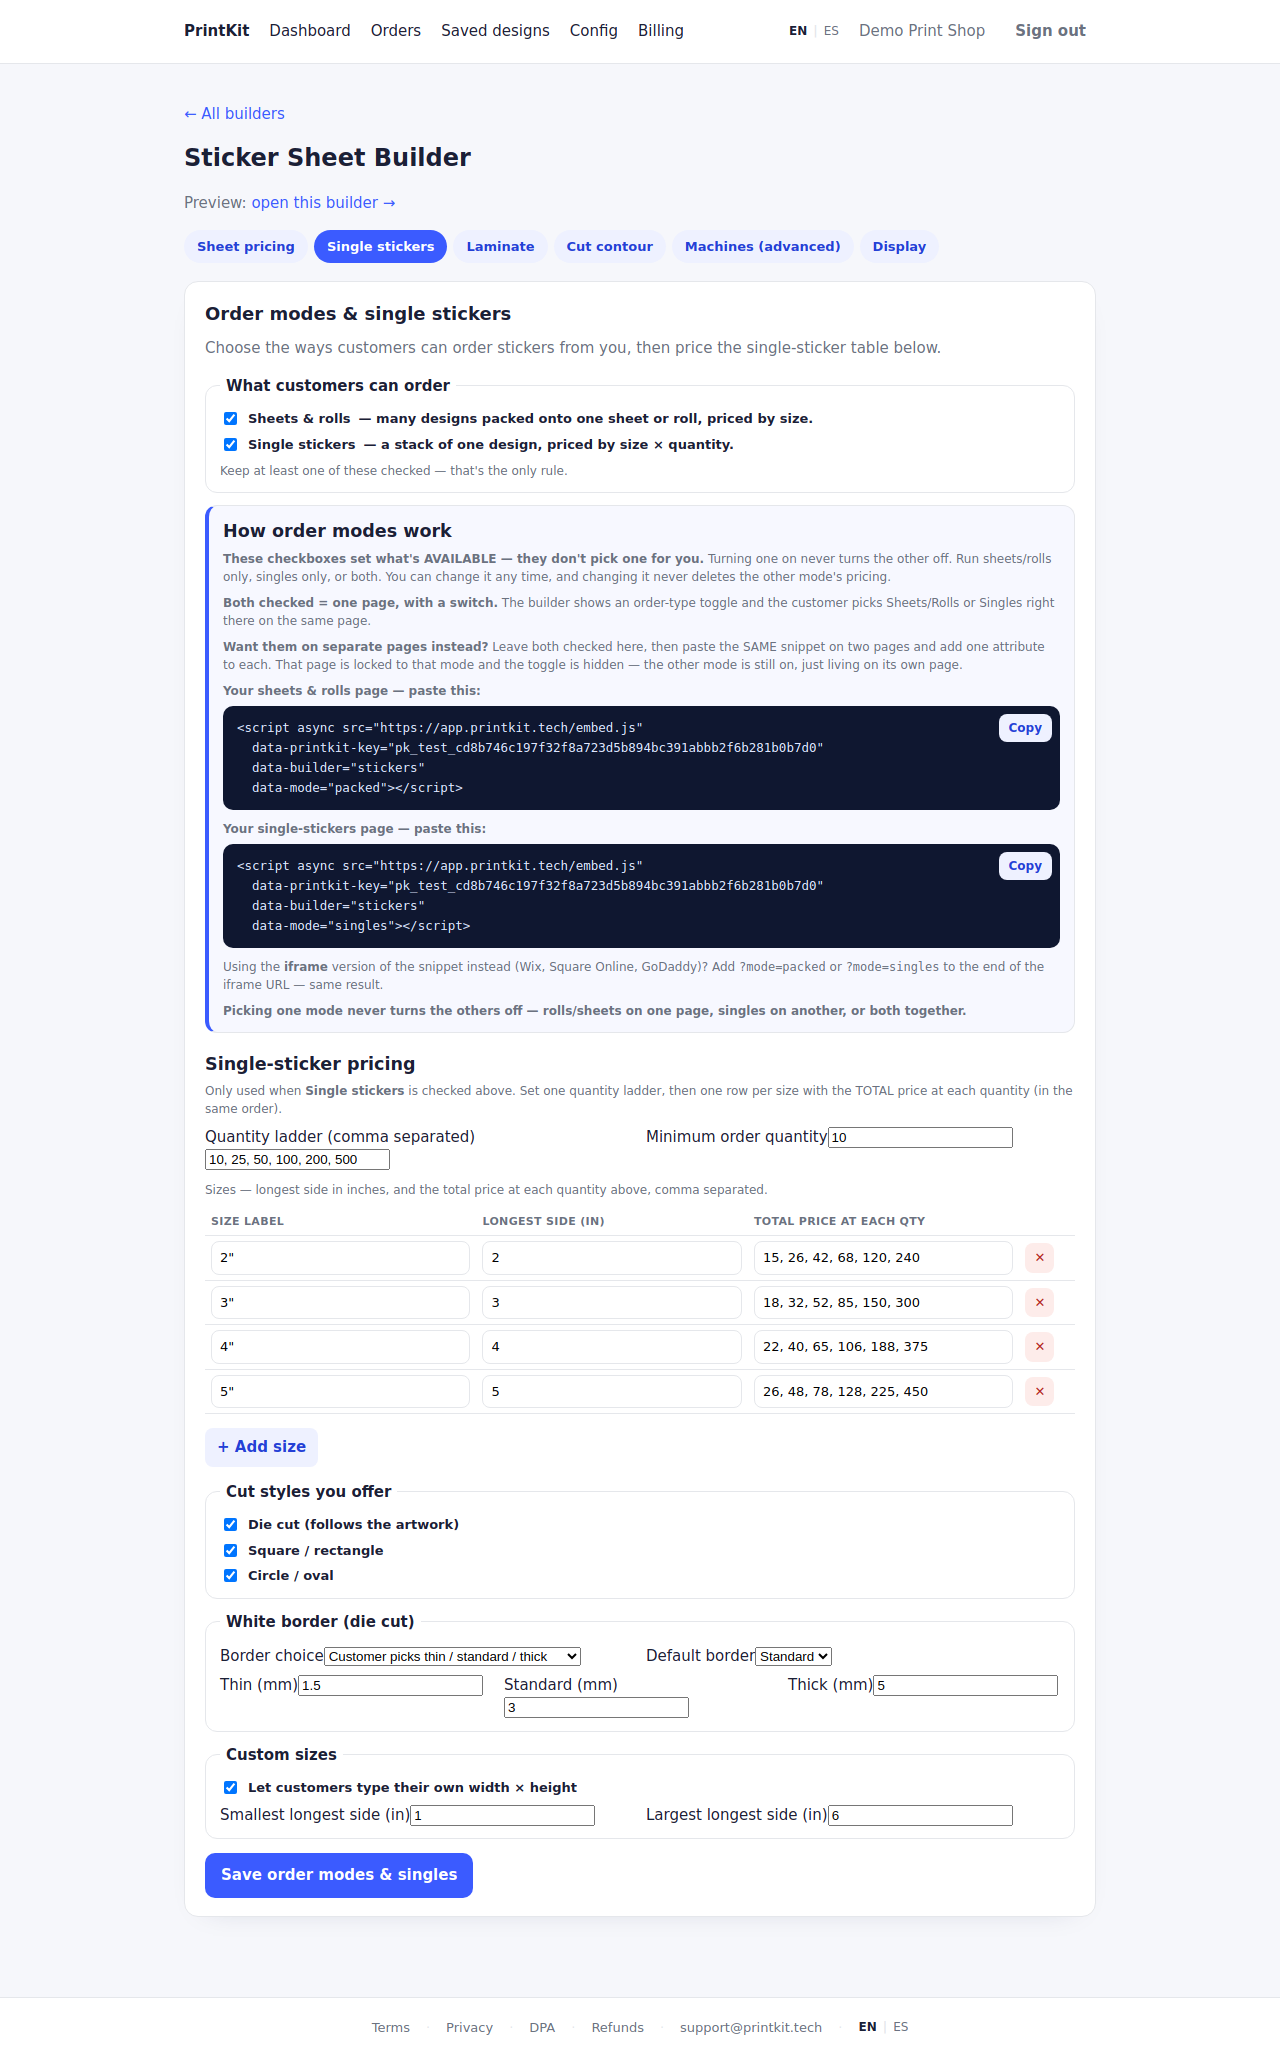
Turning one on never turns the other off. These checkboxes set what is available — they don't pick one for you. Run sheets and rolls only, singles only, or both. You can change it at any time, and changing it never deletes the other type's pricing. The only rule is that at least one has to stay checked.
If you switch one off it is genuinely gone from every sticker page for every customer, so only do that if you truly don't sell it. If you just want them on separate pages, leave both on and use the order-mode lock below.
Rolls on one page, singles on the next New
The most common setup: a “Sticker sheets & rolls” page and a “Single stickers” page, each showing only its own order type with no switch on it. Leave both order types turned on, then lock each page to one of them.
Any website — one attribute on the snippet
Paste the same snippet on both pages and add one attribute to each:
<!-- your sheets & rolls page -->
<script async src="https://app.printkit.tech/embed.js"
  data-printkit-key="pk_live_your_key"
  data-builder="stickers"
  data-mode="packed"></script>

<!-- your single-stickers page -->
<script async src="https://app.printkit.tech/embed.js"
  data-printkit-key="pk_live_your_key"
  data-builder="stickers"
  data-mode="singles"></script>
Using the iframe version of the snippet instead — the one Wix, Square Online and GoDaddy need?
The same page takes ?mode=packed or ?mode=singles on the end of the iframe
URL. You don't have to type either one: your portal's Single stickers config tab
shows all four — both script tags and both iframe URLs — with your real key already filled
in and a copy button on each.
Shopify app — one dropdown on the block
Add the Product Builder block to each page and set its Sticker order type: “Single die-cut stickers only” on one page, “Sticker sheets / rolls only” on the other. That page locks to the one type and hides the switch. Nothing to type and no links to edit.
Online Store → Themes → Customize → the page you want → Add block → Product Builder → Sticker order type. Leave it on “Let shoppers choose” to keep the switch on that page.
Linking to the builder instead of using the block? If you point a menu item, a
button or an iframe at the builder's own storefront page, that page takes a
?mode= instead. You don't have to write it: the Single stickers card
in the app shows both links ready-made with your store's domain already filled in, each with its own
copy button.
https://YOUR-SHOP.myshopify.com/apps/presskit/embed/stickers?mode=singles
https://YOUR-SHOP.myshopify.com/apps/presskit/embed/stickers?mode=packed
Locking a page never disables anything. A locked page simply hides the order-type switch and shows the one type you chose. The other type is still fully on, still priced, and still live on any other page. Rolls and sheets on one page, singles on another, or both together on one — they never interfere with each other.
What you configure
| Setting | What it controls |
|---|---|
| Order types | Sheets & rolls, single stickers, or both. At least one must stay on. |
| Sheet sizes & prices | The sheet and roll sizes you sell and the price of each. |
| Machines | Whether a machine is a roll printer or a sheet printer, and its real width. Set in initial setup; drives the shopper's Print on chooser when you have more than one. |
| Single-sticker sizes | Your size list (label + longest side in inches), plus optional custom W×H with your own minimum and maximum. |
| Single-sticker price grid | One quantity ladder shared by all sizes, then the total price for each size at each quantity. |
| Minimum quantity | Hides tiers below it and shows the shopper a minimum-order note. Set 1 for no minimum. |
| Cut styles | Which of die-cut, square/rectangle and round you offer on single stickers. |
| White border | Locked to one width, or the shopper's choice of thin / standard / thick — and what those three widths are in millimetres. |
| Laminate | Gloss and/or matte, each toggleable. |
| Cut-line mode | App — PrintKit produces the contour cut file — or self, where you add the cut path in your own RIP and PrintKit outputs art only. |
| Cut-line color & spot name | The contour color and the spot-color name your cutter looks for (a magenta line named CutContour to begin with). |
| Rush | Optional rush fee, set per shop. Off means no rush charge is ever applied. |
| Background removal | Whether shoppers get the one-tap Remove background button, which turns a solid background into a die-cuttable shape. |
What arrives in the work ticket & print file
Sheets and rolls
- One nested sheet file at your print width with the white lip applied, sized to the real sheet dimensions.
- A cut-contour PDF alongside it, at true size, with one cut path per sticker on the sheet, drawn in your cutter's spot color. (This is produced when cut-line mode is set to app; choose self and you get the art file only.)
- Work ticket listing the sheet size, stickers on the sheet, white border, sheet fill, quantity of sheets, laminate, rush and the export DPI, plus the mockup and the customer's contact details.
Single stickers
- One print-ready PNG at 300 DPI, sized to the cut box — the art only, on a transparent background. The white lip is deliberately left transparent because it is unprinted white vinyl, not printed white ink.
- A cut-contour PDF at the true cut size, with the shape you sold: the art outline for die-cut, a rectangle for square, and a true circle at the ordered diameter for round.
- Work ticket showing the builder as Single Stickers, the shape and size, and the copy count printed large for the bench.
Single-sticker orders are never auto-ganged. A singles order is N copies of one sticker, so PrintKit hands you one print-ready file and a big copy count and lets your RIP do the step-and-repeat. Packed sheets are included in the combined gang sheet as usual.
DPI is a warning, never a blocker. Low-resolution art is flagged on screen — “Low quality — your art is about 128 DPI at 5″ and may print blurry. Upload a sharper file or pick a smaller size.” — and the shopper is asked to confirm before adding low-res art to the order. They can always go ahead. A high DPI reading alone doesn't guarantee a good print: a blurry or already-upscaled source file can still print soft.