What the customer sees
Shoppers pick a garment and a blank, choose a color and sizes, choose where the print goes, then add art and text on a live canvas. The garment renders at true scale with your print-area guides drawn on it — the standard area included in your price, and the larger oversize area labelled with its upcharge. Price updates as they go, including bulk quantity breaks.
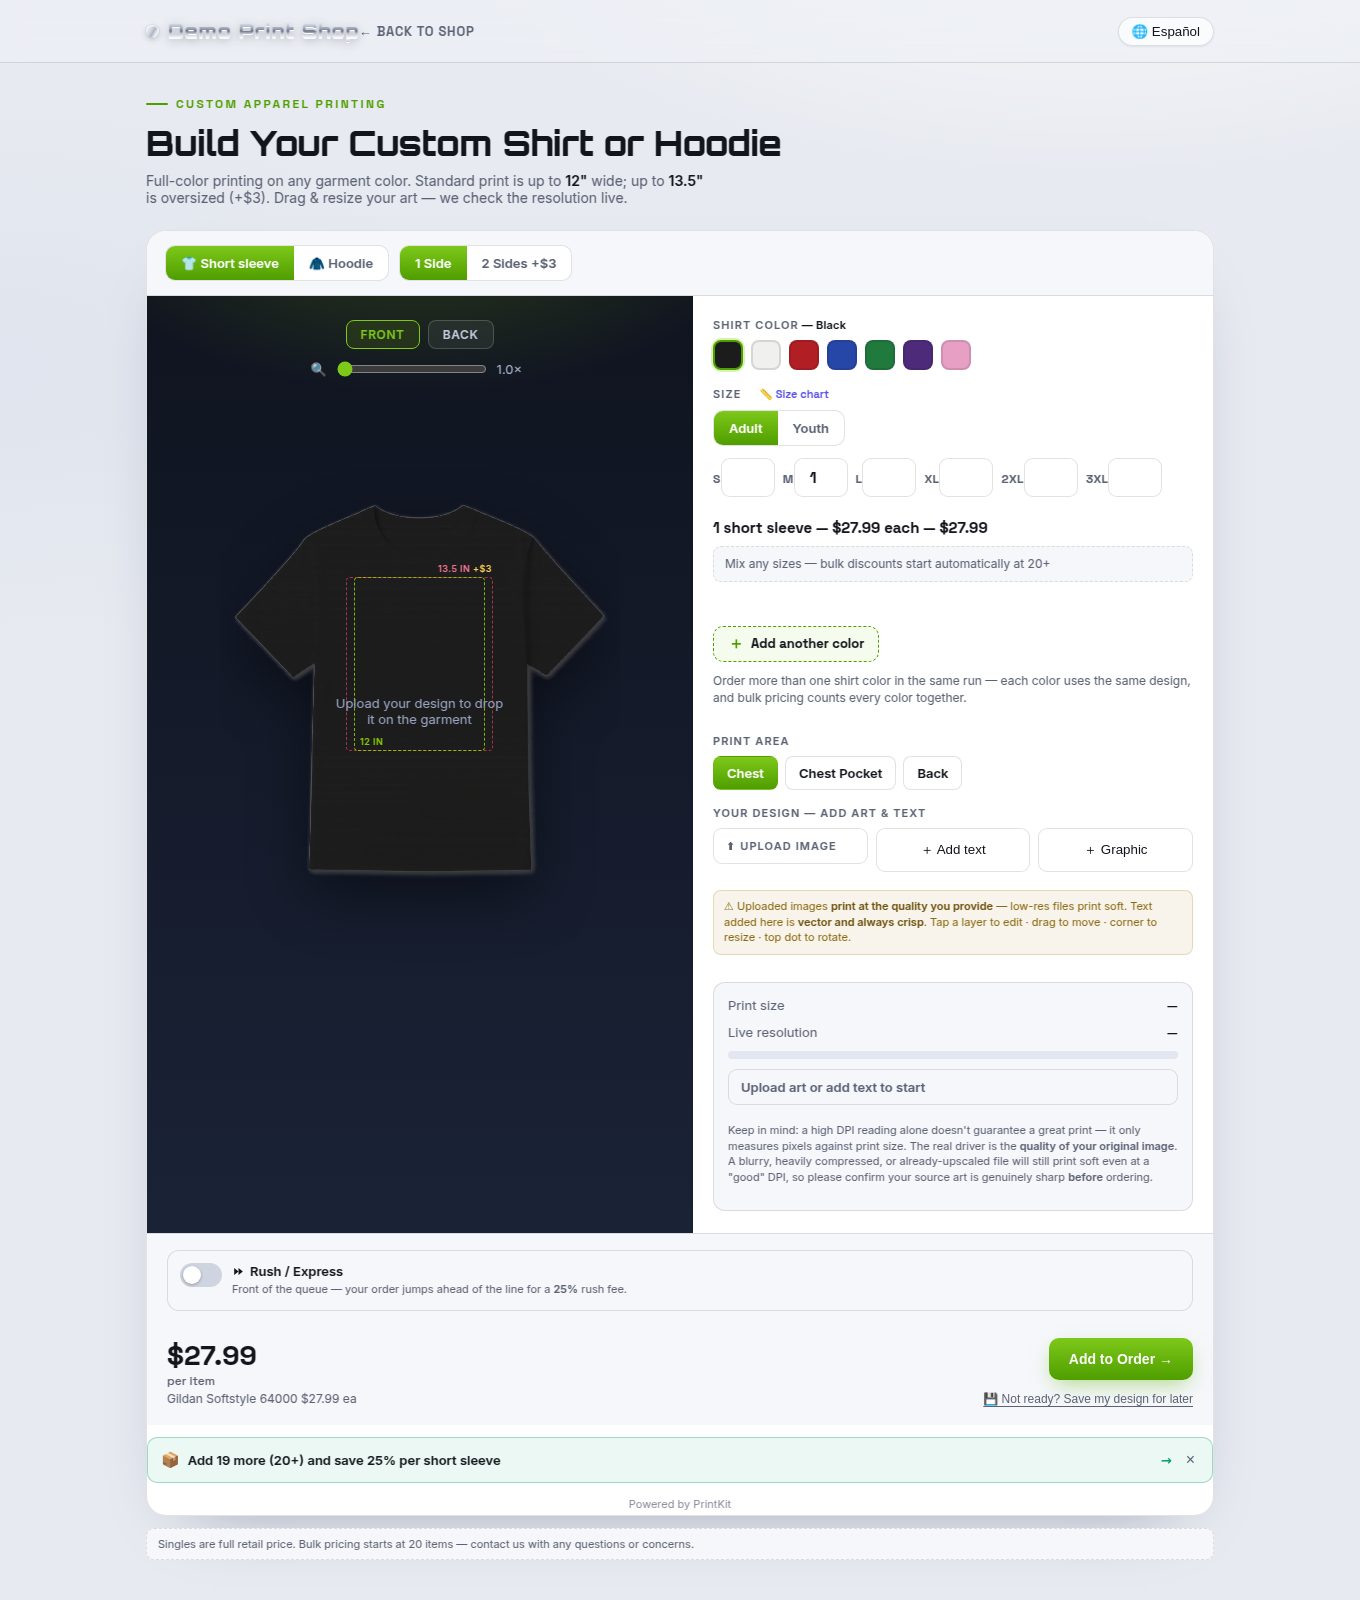
Every PrintKit builder is touch-first, so the same experience works on a phone.
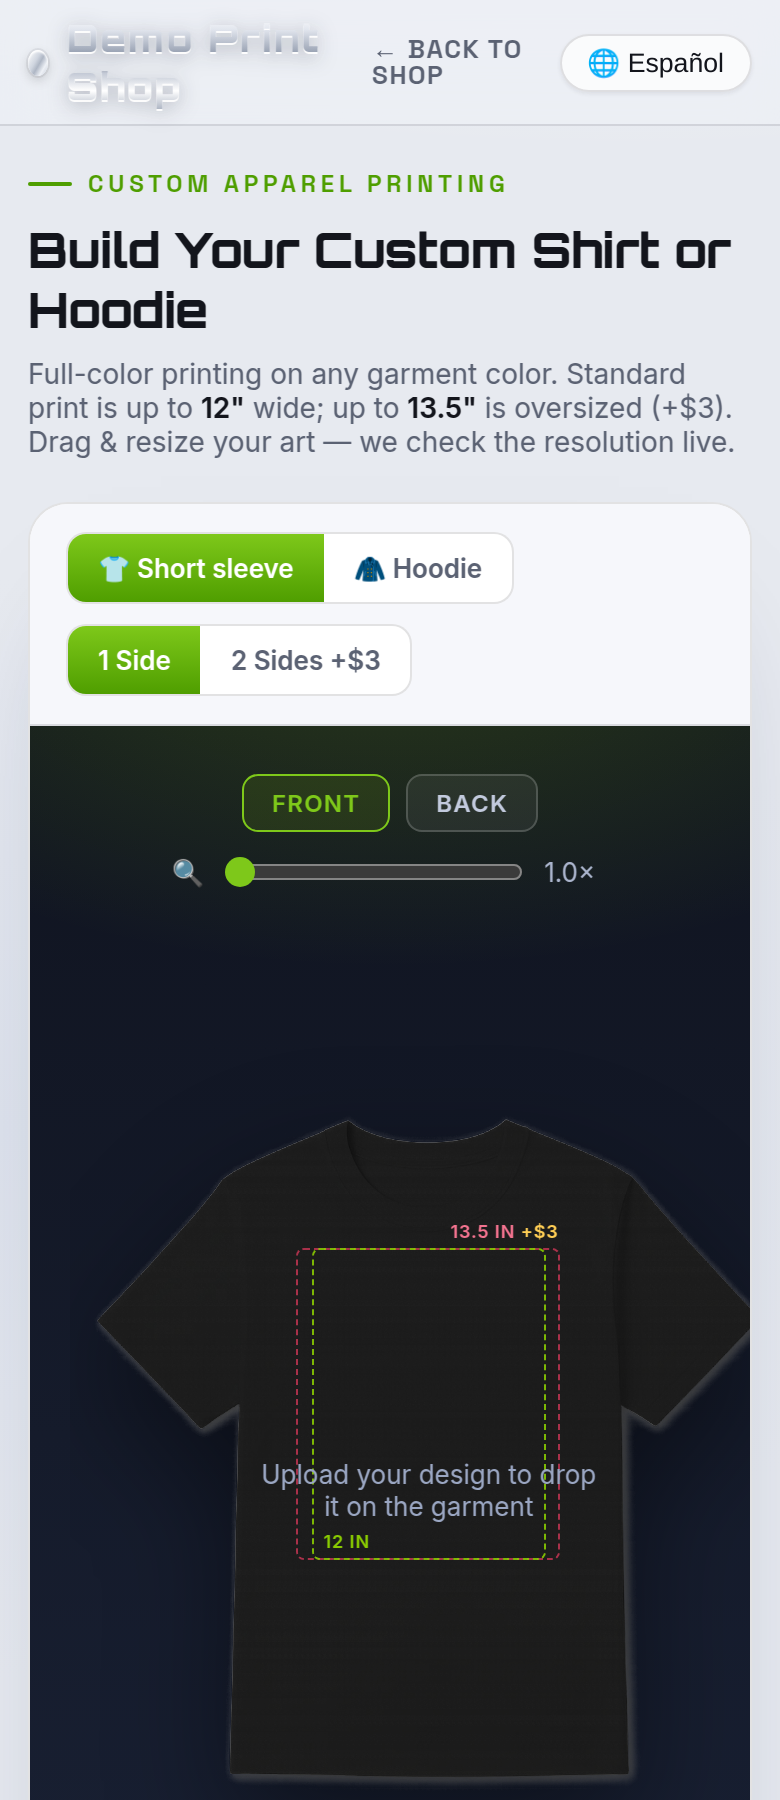
| Control | What the shopper does |
|---|---|
| Garment | Switches between the garments you offer — short sleeve, hoodie, crewneck, long sleeve, cap. |
| Sides | 1 Side or 2 Sides, with your extra-side fee shown on the button. |
| Front / Back | Flips the canvas to design each side. A zoom slider inspects detail. |
| Color | Your swatches, with the selected color's name spelled out next to the label. |
| Size | An Adult / Youth toggle and a size grid the shopper types quantities into, plus a size-chart link. |
| Add another color | Orders more than one garment color in the same run — same design on each, and bulk pricing counts every color together. |
| Print Area | Chest, Chest Pocket or Back. |
| Your Design | Upload an image, add text (vector, always crisp) or add a graphic, then drag, resize and rotate on the canvas. |
| Remove background | A one-tap Remove background — free button on an uploaded image, where you enable it — useful for the customer who uploads a logo on a white square. |
| Print size & Live resolution | A panel showing the design's real printed size and a live resolution reading. |
| Rush / Express | Optional, only if you enable it. Shown as “front of the queue” with your rush percentage. |
| Save my design for later | Emails the shopper a link back to their in-progress design. |
Placement before upload New
On phones the controls now run Color → Print Area → Your Design → Size, so the shopper chooses where the art lands before they upload it. It solved a real support problem: customers were uploading art before they knew whether they were buying a full chest print or a small left-chest pocket, then having to redo it. Desktop already showed the print area alongside the canvas and is unchanged.
Minimum order notice
If you set a minimum order quantity, a notice appears at the very top of the builder reading “Minimum order: 12 — mix any sizes/colors”, so nobody designs a one-off and discovers the minimum at checkout. The count is across the whole grid and every color, and the server enforces it too, so a shopper cannot get under it. Leave it at 1 and no notice appears.
The same notice is used by the Embroidered Apparel and UV Substrate builders. The single-sticker minimum is a separate setting inside the sticker builder.
Any-website edition: the minimum-order field is currently only in the Shopify app's builder setup. If you run PrintKit on your own website and want a minimum on apparel, embroidery or UV substrate, email support@printkit.tech and we will set it for you until the portal field ships.
What you configure
Set all of this in the apparel builder's setup — the PrintKit app in your Shopify admin, or Config → Full Color Apparel Builder in your PrintKit portal. Your saved values become both what shoppers see and what PrintKit charges.
| Setting | What it controls |
|---|---|
| Garments you offer | Short sleeve and hoodie are on by default; crewneck, long sleeve and cap can be switched on. Each is individually toggleable. |
| Blank brands & price | Per garment, the list of blanks you stock, each with its own price and label. |
| Colors | Name, swatch hex and an optional per-color upcharge — shared across garments, or per garment (below). |
| Sizes & upcharges | The size range you offer and any per-size upcharge. Youth sizes can carry their own pricing. |
| Print area & fees | A standard print size included in the base price and a larger max size. Standard→max adds your oversize fee; beyond max is not allowed. The extra-side fee lives here too. |
| Placements | Chest, chest pocket and back print locations. |
| Bulk tiers | Quantity price breaks, fully editable per garment. The builder nudges the shopper when they are close to the next tier. |
| Minimum order quantity | Blocks checkout below this many units. 1 means no minimum. |
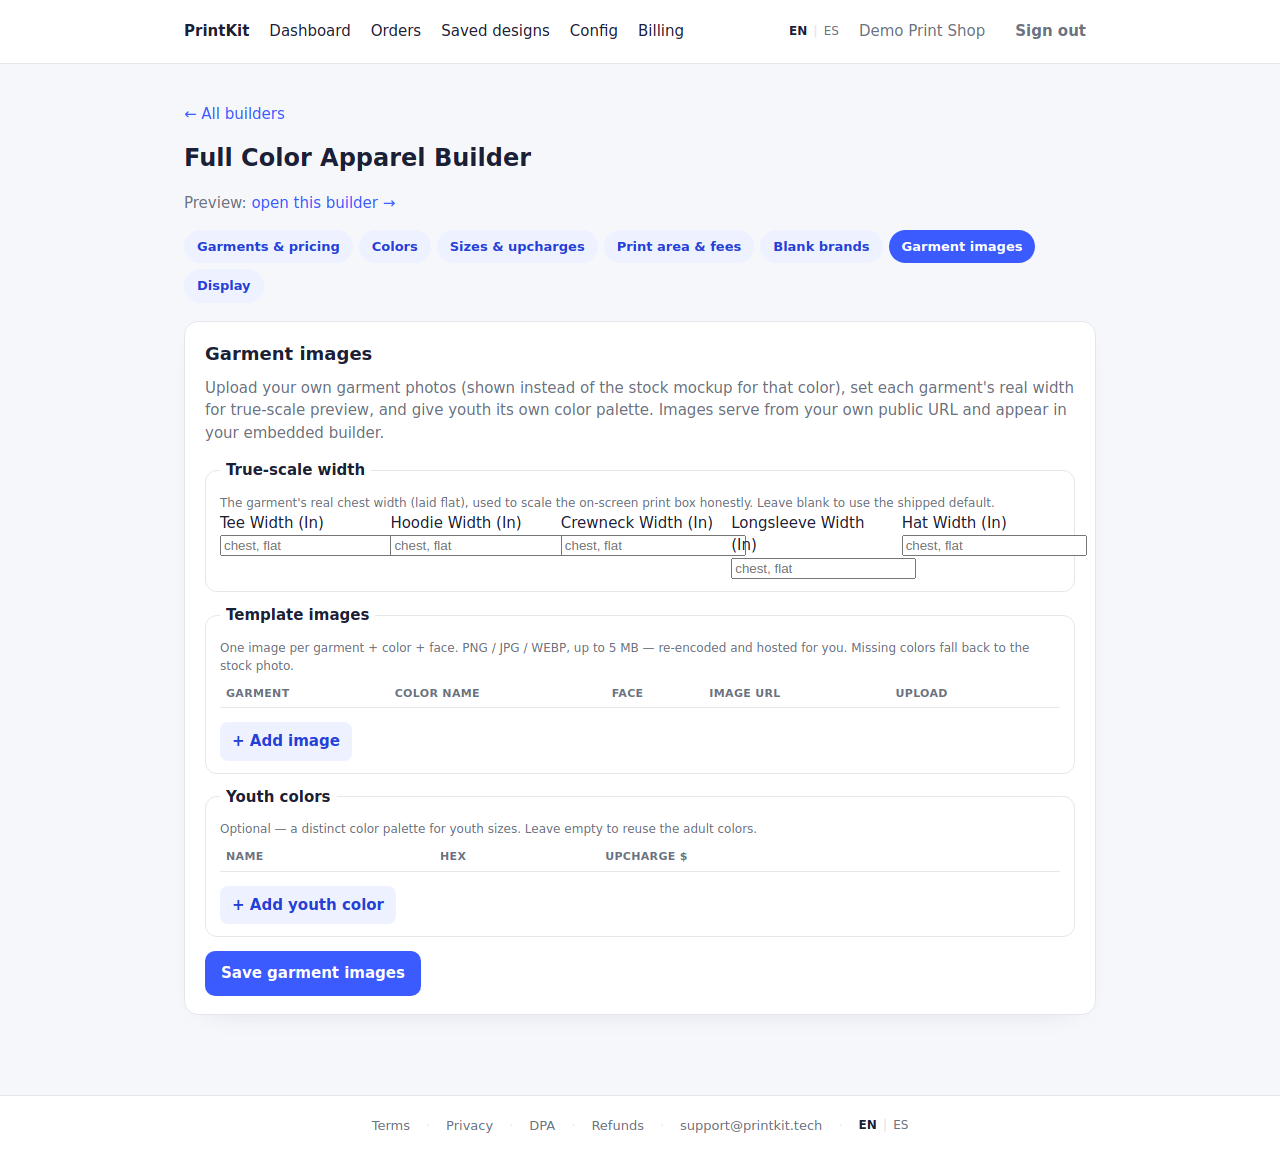
| Garment images | Your own blank photos per garment, color and side, plus each garment's real chest width for true-scale preview, and an optional youth palette. |
| Print method | You run the file however you print — DTF, DTG, sublimation, vinyl (HTV) or screen print. The work ticket labels the method for your bench. |
| Background removal | Whether shoppers get the one-tap Remove background button on their own uploads. |
| Display | The builder's heading, tagline and optional link to your own translated page. |
Shared with Embroidery. The garments and print locations you set here are reused by the Embroidered Apparel Builder — configure them once.
Per-garment color sets & color names New
Most shops run one shared palette and that still works exactly as before. But real blanks differ — a hoodie may not come in the same colors as your tees. You can now give any garment its own palette.
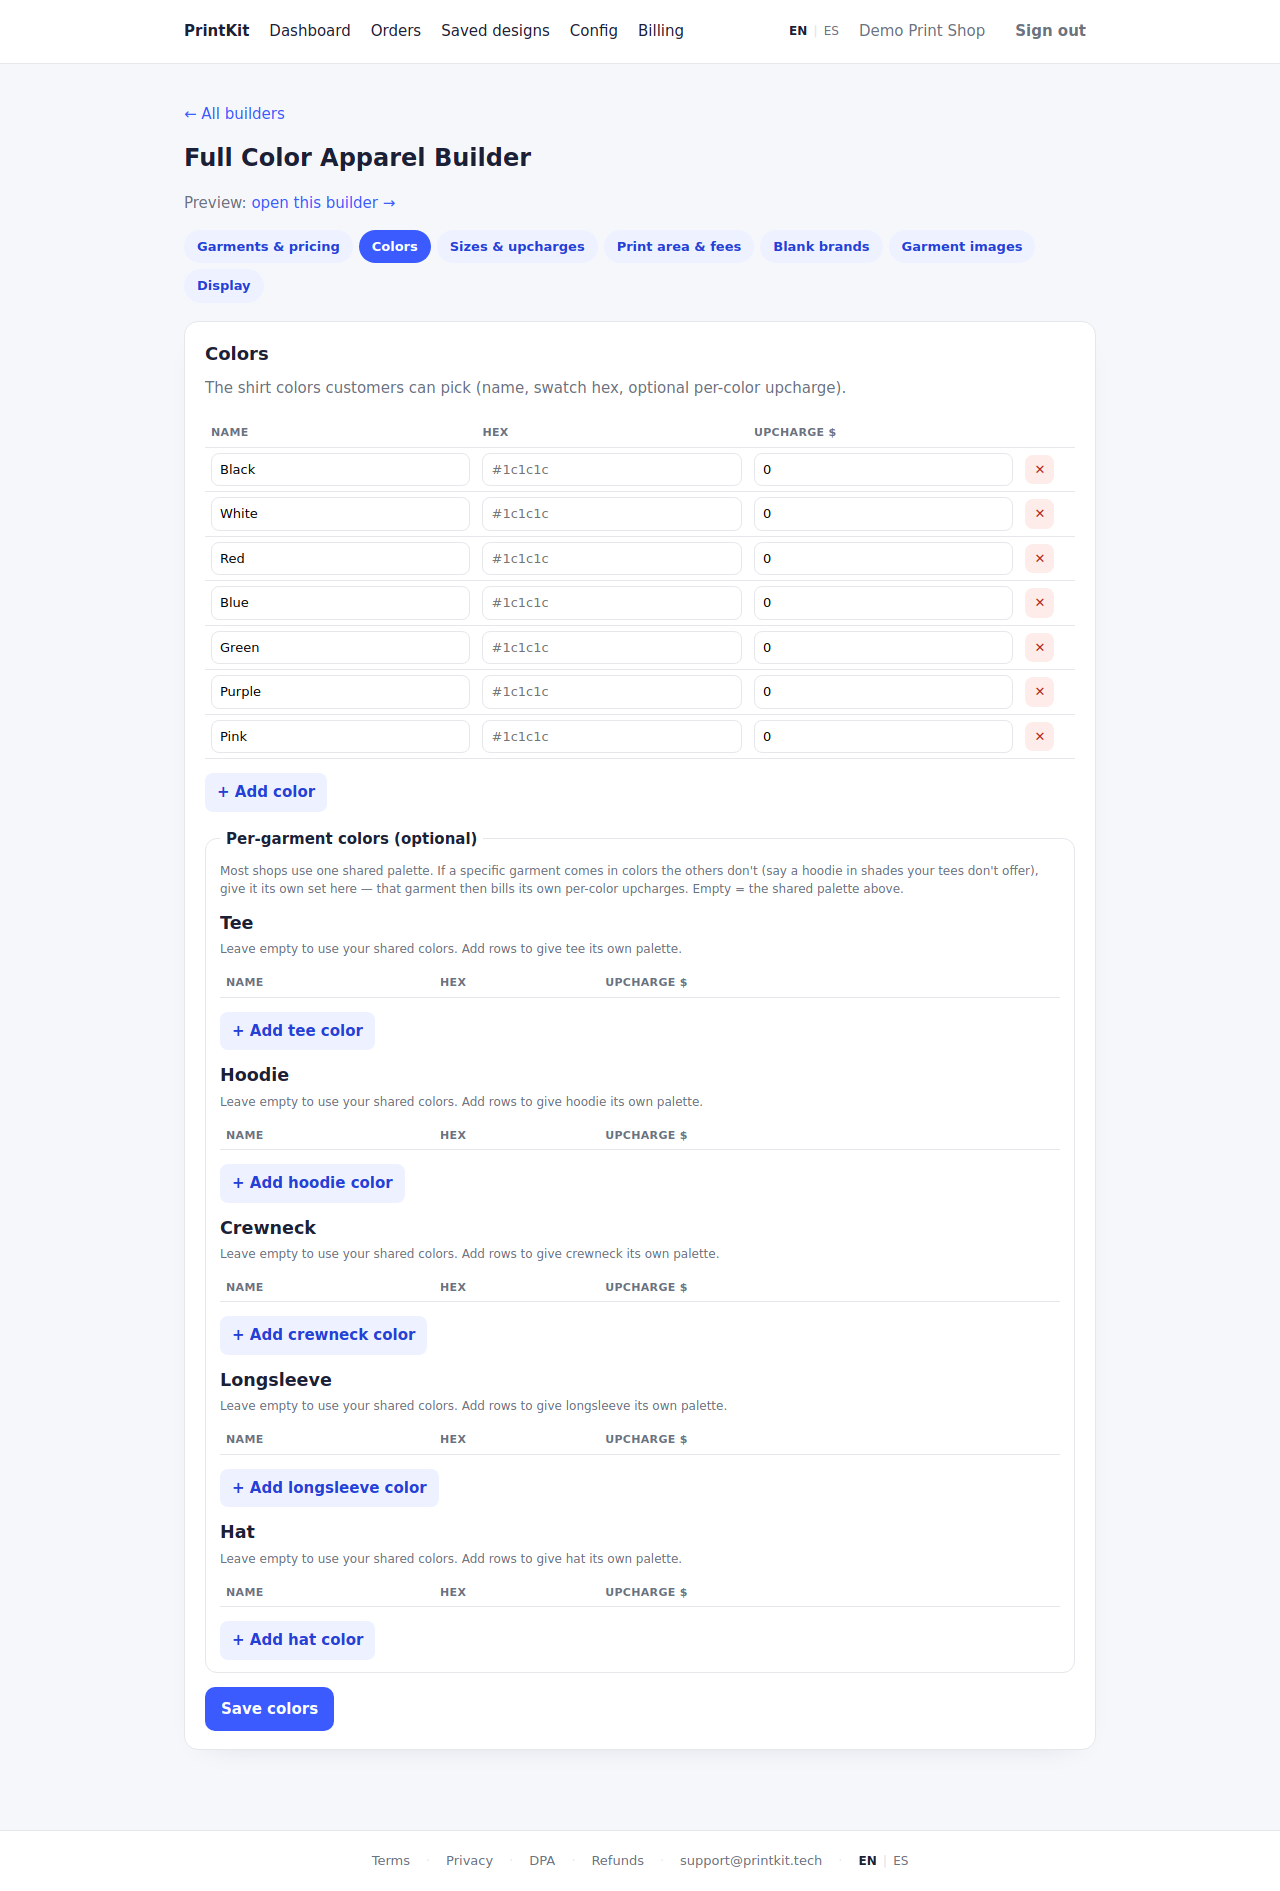
How the fallback works. Leave a garment's palette empty and it uses your shared colors. Add even one row and that garment uses only its own set — and bills its own per-color upcharges. Youth sizes follow the same idea: a garment's youth palette, then your shop-wide youth palette, then that garment's adult colors. If a shopper has a color selected and switches to a garment that doesn't offer it, the builder snaps them to the first valid color rather than leaving an invalid pick.
Where the editors differ. In the Shopify app each garment gets its own Colors card with a Custom set / Using defaults badge, a Reset to defaults button, and a separate youth palette. In the any-website portal the per-garment palettes live in one Per-garment colors (optional) section on the Colors tab, and cover adult colors — a per-garment youth palette is Shopify-only for now.
Color names
Swatches are no longer anonymous. The section label spells out the selected color — SHIRT COLOR — Forest Green — and every swatch carries its name for hover and for screen readers. The name shown is exactly the name you typed, in both English and Spanish, so what the shopper reads is what appears on your work ticket. The label is always visible rather than hover-only, because hover doesn't exist on a phone.
Your own garment photos & background removal New
You are not stuck with our stock mockups. Upload a photo of the blank you actually stock — one image per garment, color and side — and it replaces the stock photo for that color. Anything you don't upload keeps the stock photo, so you can do this one garment at a time.
Remove background
Photos of real blanks usually have a background you don't want. Next to any uploaded garment or substrate photo there is a Remove background button. It opens a side-by-side preview — Original on the left, Background removed on the right, on a checkerboard so you can see the transparency — and nothing is saved until you choose. The buttons are Keep original and Apply background removed.
Your original is always kept. Applying the cutout saves it as a new image; the file you uploaded stays on the server. Photos are capped at 8 MB and must be PNG, JPG or WEBP. There is a rate limit — if you are working through a lot of blanks at once you may see “too many background removals — please wait a minute and try again”. Wait a minute and carry on.
The same button appears on UV Substrate product photos in both editions, and on embroidery mockups in the Shopify app.
Positioning each print zone New
Once you upload your own garment photo, PrintKit needs to know where on that photo each print zone sits. In both editions every uploaded photo gets its own per-zone controls in the apparel setup: you drag a box over the area and resize it from the corner, and the control shows you once that zone is set.
- Chest — where a standard front design lands.
- Chest Pocket — the small left-chest logo area, sized to your pocket print.
- Back — the full back print area.
Chest and chest pocket are positioned on the front photo, back on the back photo, so a zone control only appears once that side has a photo. A zone you never position keeps PrintKit's built-in placement, which is correct for stock mockups and for most uploaded photos. The other builders use a single print-area box instead of zones.
It moves the box on the photo, not the print size. Positioning changes where the guide is drawn on your mockup. The actual print dimensions still come from the inches you set in Print area & fees, so the file that reaches your press is unaffected.
Where the editors differ. In the Shopify app the buttons read Position Chest, Position Chest Pocket and Position Back, each showing a check mark once that zone is set, and they cover tees, long sleeves, hoodies and crewnecks — caps keep a single front box. In the any-website portal the controls sit on each row of the Garment images tab as Chest, Chest pocket and Back buttons, each with a Set badge and a reset arrow that puts that zone back to the built-in placement. Both open the same drag-and-resize box on your own photo, and both save the same per-zone values. UV substrates and embroidery placements use the single-box Calibrate tool in both editions.
One photo → every colour New
Photographing every colorway of every blank is a day's work. Instead, upload one white garment photo and PrintKit generates every color in that garment's palette, then shows you an approval grid. Nothing goes live until you approve it, one color at a time.
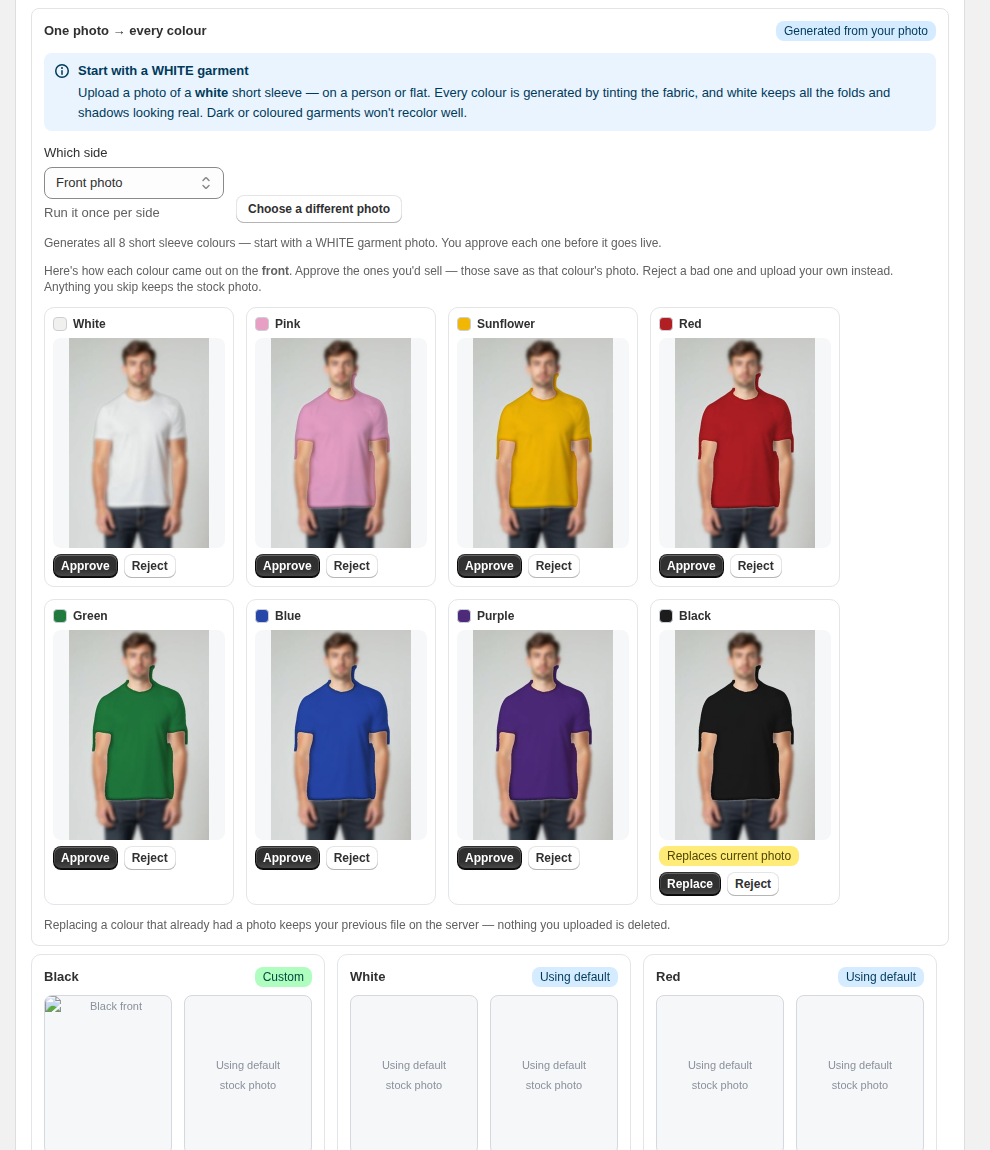
Start with a WHITE garment. This is the one rule that matters. Every color is produced by tinting the fabric in your photo, and tinting can only darken — white is what keeps the folds and shadows looking real. A dark or already-colored garment will not recolor well. If the source doesn't look white, PrintKit says so (“That doesn't look like a white garment”) but still shows you the results — you can approve any tile that came out right.
How it runs. Pick Front photo or Back photo, choose your source image, and run it once per side. Finding the garment in the photo takes a few seconds — longer for a photo of a person wearing it — then each color is tinted in a fraction of a second. When it finishes you get one tile per color.
| Your choice | What happens |
|---|---|
| Approve | Saved as that color's photo, exactly as if you had uploaded it yourself. |
| Replace | Same as approve, for a color that already had a photo. Your previous file stays on the server. |
| Reject | Nothing is saved — that color keeps the stock photo, and you get an option to upload your own instead. |
| Skip | Leave a tile undecided and it simply keeps the stock photo. |
Practical limits: up to 24 colors per run, and a handful of runs per ten minutes. If your palette is longer, trim it or run it in batches.
What arrives in the work ticket & print file
- Press-sized 300-DPI file. A transparent PNG sized to the exact print area the shopper chose, ready to run on DTG or DTF. What the shopper positioned is what exports.
- Exact real-life sizing. The print exports at the physical dimensions selected — placed and sized to true inches, not a guess.
- Work ticket. Garment, blank, color (by name), sizes and quantities, every color in a multi-color run, placement(s), print method, rush, plus a mockup thumbnail and the customer's contact details.
- Production Pack. One ZIP for the bench: the print-ready file(s), a work-ticket PDF and the mockup, with an option to auto-nest onto a gang sheet at your machine width.
DPI is a warning, never a blocker. The meter reads “Print-ready — crisp at this size”, “Getting low — it may look soft at this size”, or “Too low-res for a clean print this big” — but the shopper can always complete the order. The builder is honest that a high reading alone doesn't guarantee a great print: it only measures pixels against print size, so a blurry, heavily compressed or already-upscaled file can still print soft at a “good” DPI. Uploaded art prints at the quality provided; text added in the builder is vector and always crisp.